Introduction to the importance of colour correction with an achromatic doublet
Colour fills the world. When we image those colours with lenses, we want it to represent what we see. Even in the days of black-and-white photos, the scene is is colour, right?
Without colour correction, we can get blurry photographs since each of the wavelengths in the colour spectrum will image to a different place. We can also get the problem of splitting colours where we can see fringes of blue or red on the edges of the image.
For other applications, like laser applications, it is absolutely crucial to achieving performance with multiple wavelengths for some systems.
How do we correct for colour correction? We do it with achromatic doublets!
This post is about the achromatic doublet, but the concepts can be applied to a lot of lens systems. Don’t forget your preliminary lens design and analysis!
Doublets and thin lenses
Thin lenses can be valuable for a lot of preliminary lens design calculations.
But what is meant by preliminary lens design?
The achromatic doublet corrects chromatic aberrations, but the corrections can be calculated with thin lenses. Colour-corrective achromatic doublets for objectives, most notably the objective lens for a telescope are most common and easiest to explain. The objective form is also used elsewhere, even if it is not a telescope. Such as collimator lenses, which we usually design backward from actual use, which makes it identical to a telescope objective!
For these systems, the focal length is usually extremely long compared to the lens’ physical thickness, making it close to a thin lens (in practice). That is to say, that in terms of calculations, the thickness is so small relative to the entire focal length of the lens so that any calculations that are affected by the thickness are so small that we can ignore them. The larger effects are the radius of curvature, and the curvature can be simplified and modified into the optical power (the reciprocal of focal length), which is the thin lens equation. Thus, the doublet can be designed as a thin lens for many applications. We still have three degrees of freedom for lens design.
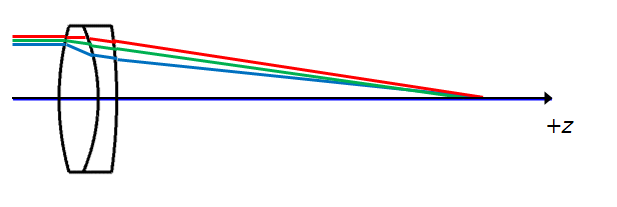
Since the system can be approximated as a thin lens, we don’t have to worry about extra calculations just yet. But the parameters we have at our disposal provide sufficient information to understand how aberrations work. This is especially true for the doublet.
The aberrations of a telescope objective
The telescope objective lens design can be optimized by balancing the following three aberrations:
- the monochromatic spherical aberration
- the coma
- the chromatic aberration, in the longitudinal direction
This may seem like oversimplifying, but this is all we need from the specifications. Even for more complex systems, the goal of lens design is not to make all the aberrations zero, because this is usually not possible. We need to keep certain aberrations at designated values, non-zero, so the overall performance is good.
The steps to designing an achromatic doublet
In a nutshell, these are the steps:
- Choose glass
- Colour correction by thin-lens equations
- Suitable radius R of the lenses
- Change to a thick lens, and raytrace.
- Correct chromatic aberration by changing R2, and using R3 , but make sure to keep the focal length intact.
- Balance the shape of the lens to balance the spherical aberration
- I’ll explain steps 1 and 2, because that is more relevant to the question in terms of the “thin lens” part of lens design.
We’ll explore this in detail with a real-world example.
Step 1: Choose your glass. This part determines the colour correction.
Chromatic aberration is corrected by choosing glass. The thin lens equations are used to calculate how much chromatic aberration there is in a doublet, and balance them.
Typical glass properties
Typical glass has a higher refractive index at shorter wavelengths. This causes chromatic aberration, since the focal length will be different for different wavelengths.
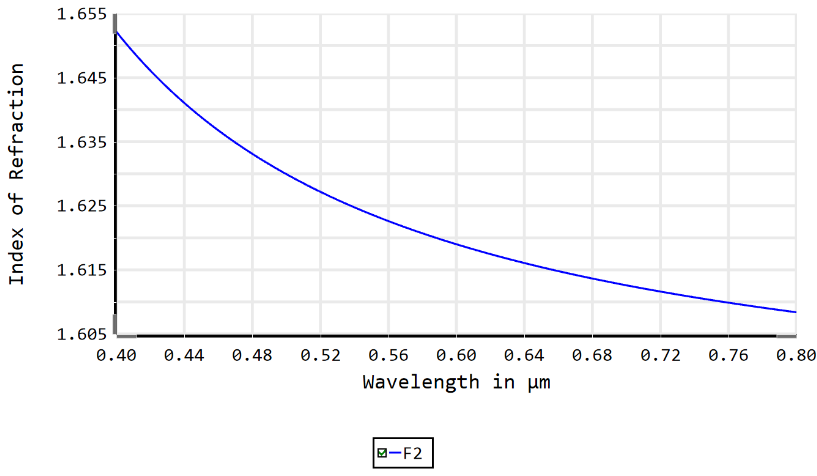
If we made a singlet lens we can’t correct for the colour.

Choosing the glass types so that the red, green and blue lines line up at the focal point, and we have corrected for colour (The images are exaggerated, but still). This is done by cancelling the chromatic aberration caused by the positive lens by generating an opposite chromatic aberration with the second lens.

With a good choice of glass, even though the positive lens will spit the colour, the stronger dispersion of the negative lens will spread the colour strongly in the opposite direction compared to the positive lens, and line up the red, green, and blue lines.
Choosing glass
Choosing the glass types for the cemented doublet is not trivial. People mulled for decades to derive an equation, or a theorem that could be used for glass selection. In reality, it is plug and play, trial and error. (This is the very reason why lens design itself is as difficult as it is. However, a good lens design depends on proper knowledge of the theory. Some parts of the theory are not complete. The irony!)
The thin lens equation is:
$$
\phi = \phi_1 + \phi_2\ \\
\phi = (n-1) (1/R_1 + 1/R_2) = 1/f\ \\
C_1 = 1/R_1, C_2 = 1/R_2\ \\
Total C = C_1 + C_2
$$
where \(\phi\) = lens power, and R = radius. Here, \(\phi_1\) is the positive lens, and \(\phi_2\) is the negative lens.
With the above equation, we can calculate the focal length of a lens with the radius of curvature. the total curvature Total C is a useful measure to have while looking at the power of the lens.
The colour correction equation is:
$$
Chromatic = \phi_1/\nu_1 + \phi_2/\nu_2
$$
Where \(\phi\)= lens power, \nu = Abbe number.
The Abbe number \(\nu\) is a measure for the dispersion of the material. Dispersion, conceptually is a measure of how much the rays change with a given wavelength. Thus, the Abbe number is defined by the following equation.
$$
\nu = (n_d – 1)/(n_F – n_C)
$$
Thin lens calculation
The chromatic aberration is calculated with the above thin lens equations, which is what we need for an achromatic doublet. The shapes of two lenses need to total the targeted focal length. Just a reminder, the thin lens system is for lenses that have a long focal length relative to the thickness of each of the lenses.
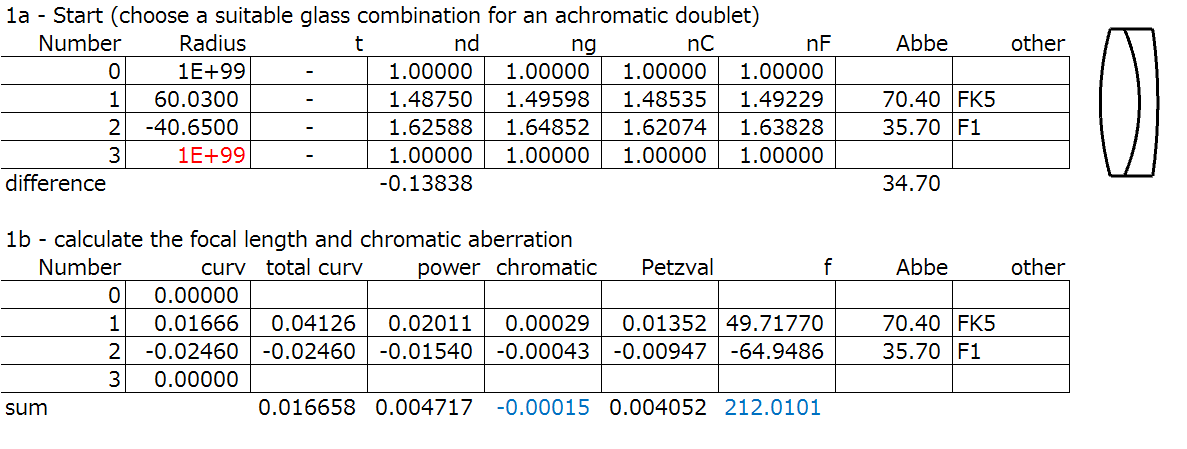
Above is the thin lens calculation result for an achromatic doublet. The two curvatures C1 and C2, and the total curvature TC are calculated. Curvature C is 1/R, the radius of curvature. The specification for this example is f = 100mm, Chromatic = 0. I’ve also chosen some values for the radii R1, R2 , all given above, and the glass are FK5 and F1.
Look at the table above, and the value in the “chromatic” column is close to zero at -0.00015 (in blue font). We also see that the focal length is not correct, at 212.0101mm (also in blue font). This is corrected in the next step.
Step 2: Solve the thin lens colour correction
From the thin lens equation above, these two are chosen:
$$
\phi = \phi_1 + \phi_2\ \\
Chromatic = \phi_1/\nu_1 + \phi_2/\nu_2
$$
We can solve for f = 100mm and Chromatic = 0 and get \(\phi_1\) and \(\phi_2\), as we have two variables and two unknowns.
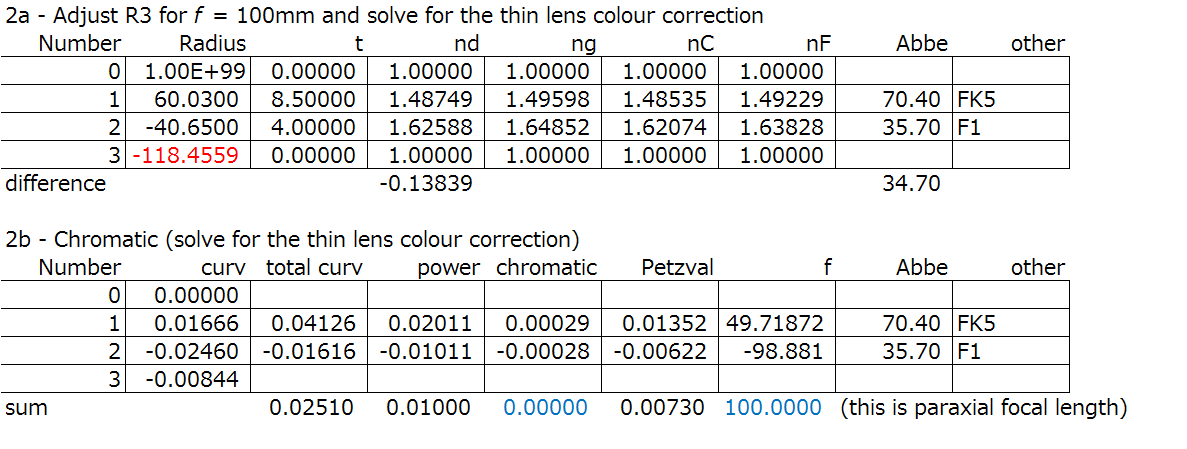
You can see in Step 2 that the R3, the curvature of the last surface (R3=-118.4559mm, in red) is solved to minimize the longitudinal chromatic aberration. If you use Excel or a similar spreadsheet program like I did, it is easy to find the solution so that the focal length is 100mm and chromatic part to be zero. Of course, you can play around with the other radii like R1 and R2.
Essentially, that’s it! This lens is already pretty good, even though we didn’t take into account any aberrations.
For an in-depth and thorough calculation of the achromatic doublet using Excel or similar spreadsheet software, I have an Ultimate Guide to lens design with a spreadsheet that walks through each of the steps and calculations.
Beyond the thin lens doublet
Step 3 and on are paraxial raytracing and evaluation of the Seidel aberrations. These all require the thickness of the lens, so we’ll stop here.
If you’re hoping for more degrees of freedom for optical correction, there is another doublet called the separated doublet.
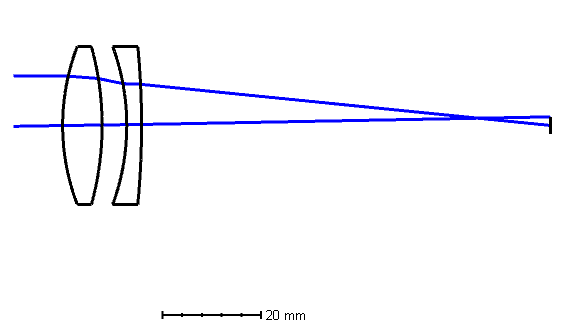
The separated doublet separates the cemented element for an extra surface for correction, which gives us an extra degree of freedom, because the cemented surface of the cemented doublet has to have the same shape. This one extra surface improves the system a lot since we didn’t have many parameters for correction, to begin with.
Bad things can come with good things, and for the separated doublet this extra degree of freedom can cause problems for manufacturing tolerances and assembly, since separated lenses are harder to align than cemented lenses.
For more extensive analysis the doublet, and other lens designs, I have written a massive post on lens design with a spreadsheet on my website. I start with the underlying theory, but I quickly move on to practical examples that include simple lens design of a singlet lens, doublet lens, and a triplet lens, all which doesn’t require expensive proprietary software to do.
The doublet is a relatively simple lens to design, but there is a lot that goes into it that can be applied to many optical systems in lens design. Colour correction is the main step in any modern lens design, so get a handle on chromatic aberrations and you’ll be miles ahead in real-world lens design.
Get Your FREE Ultimate Guide to Lens Design using the Spreadsheet Method
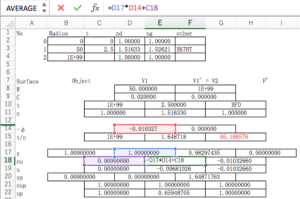
With this guide, you can:
-Save valuable time in your lens design process
-Get the Spreadsheets that show the inner workings of lens design
?-Get the fundamentals of lens design in an accessible format
This FREE ebook (and newsletter) will help you uncover the tactics of lens design. It will show you the concepts and strategies of lens design through spreadsheets so that you can take control of your lens design.
We hate SPAM and promise to keep your email safe?100% privacy, and we hate spam. When you sign up, we'll keep you updated usually with one email per week, occasionally up to a few times a week. Unsubscribe at any time.
Leave a Reply